Be yourself; Everyone else is already taken.
— Oscar Wilde.
This is the first post on my new blog. I’m just getting this new blog going, so stay tuned for more. Subscribe below to get notified when I post new updates.
Be yourself; Everyone else is already taken.
— Oscar Wilde.
This is the first post on my new blog. I’m just getting this new blog going, so stay tuned for more. Subscribe below to get notified when I post new updates.
Aidan Singh
What it is
This device with Logic Pro X will take a recording, chop it into samples based on the transients, put it into a sampler instrument, and can play back these samples like a keyboard or drum machine.
Video Demonstration
How It Works
Setup Mode:
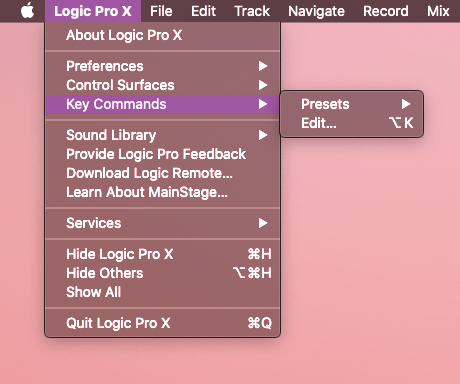
The setup mode mainly utilizes “MIDI Control changes.” When the switch is in setup mode, the buttons will each send a unique “control change” to Logic. To tell Logic how to interpret these control changes, I used the “Key Commands” setup window to to select the action I wanted a button to perform, and pressing the button, so Logic would associate the action and the button.
Through some research and browsing the possible key commands, I found that I needed these 4 commands to make my device convenient and effective: “Record” “Stop” “Slice at Transient Markers” and “Convert Regions to New Sampler Track”
I made the first button trigger “Record” the instantaneous moment it is pressed, and trigger “Stop” the moment it is released. The second button triggers the “Slice…” command when pressed, and the third triggers the “Convert Regions…” command when pressed.
In the bottom right corner of the below photo, you can see the “Control Change” assignment that Logic learned to trigger the “Record” function from my button press. This is in the “Assignments” part of the window.
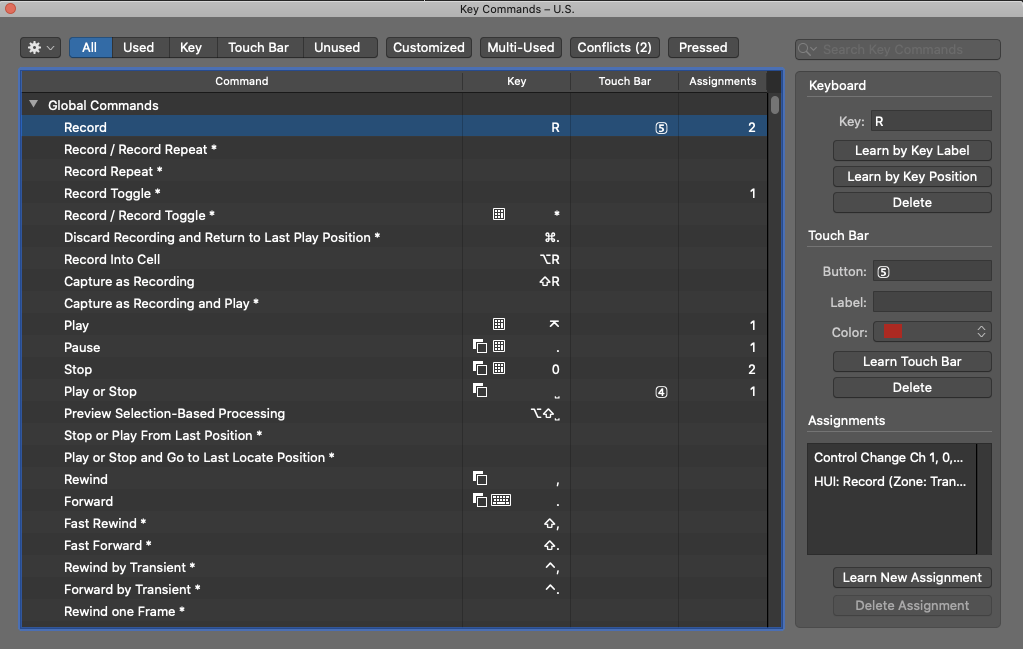
This control change is sent by the teensy using the function: usbMIDI.sendControlChange(Control, Value, Channel)
For the “Control” parameter I input the button’s number (from an array of 0-7), for the “Value” parameter I input the state the button changes to(1 being pressed and 0 being released.) The “Channel” is always set as 1. See lines 56 and 65 in my Arduino code.
Playback Mode:
This mode sends a different MIDI note for every button, from a “pitch” of 0 to 7, a velocity of 90, and using channel 1.
The sampler instrument remembers the last parameters I used when setting up a sampler instrument. This was to set the samples between C-2 and G#-2, which are the lowest 8 MIDI Values.
If this isn’t the default sampler setting, it is easy to change in the prompt where I named the instrument.
See where I sent the MIDI in lines 54 and 63.
This project used button code, LED updating, and array use similar to previous labs.
Arduino Code:
int ledPin [8] = {25,26,27,28,29,30,31,32};
int buttonPin [8] = {33,34,35,36,37,38,39,14};
bool lastButtonState [8] = {LOW,LOW,LOW,LOW,LOW,LOW,LOW,LOW};
bool buttonState [8] = {LOW,LOW,LOW,LOW,LOW,LOW,LOW,LOW};
bool switchedOn[8] = {false,false,false,false,false,false,false,false};
int switchPin = 15;
bool setupMode = true;
int setupLED = 9;

void setup() {
  for(int i=0;i<8;i++){
    pinMode(ledPin [i],OUTPUT);
    pinMode(buttonPin [i],INPUT);
  }
  pinMode(switchPin, INPUT);
  pinMode(setupLED, OUTPUT);
}

void loop() {

  if(digitalRead(switchPin) == LOW){
    setupMode = false;
    digitalWrite(setupLED, LOW);
  }else if(digitalRead(switchPin) == HIGH){
    setupMode = true;
    digitalWrite(setupLED, HIGH);
  }

  checkButtons();
  updateLeds();
}

//Button and LED Code Below

void checkButtons() {

  for(int i=0;i<8;i++){
  lastButtonState[i] = buttonState[i];
  buttonState[i] = digitalRead(buttonPin[i]);
  if(lastButtonState[i] == LOW && buttonState[i] == HIGH) {
    flipButtonState(i);
    delay(5);
  } else if(lastButtonState[i] == HIGH && buttonState[i] == LOW) {
    flipButtonState(i);
    delay(5);
  }
  }
}

void flipButtonState(int i) { //at moment button is pressed or released, sends MIDI or control changes
    if(switchedOn[i] == true) {//based on the mode Switch
      switchedOn[i] = false;
      if(setupMode ==false){
        usbMIDI.sendNoteOff(i,0,1);
      }else if(setupMode ==true){
        usbMIDI.sendControlChange(i,0,1);
      }

      //usbMIDI.sendControlChange(i,0,1);
    } else if(switchedOn[i] == false) {
      switchedOn[i] = true;
      if(setupMode ==false){
        usbMIDI.sendNoteOn(i,90,1);
      }else if(setupMode ==true){
        usbMIDI.sendControlChange(i,1,1);
      }
    }
}

void updateLeds() {
  for(int i=0;i<8;i++){
  if(switchedOn[i] == true) {//lights LED if button was pressed
    digitalWrite(ledPin[i], HIGH);
    }
    else {digitalWrite(ledPin[i], LOW);
  }
  }
}
Aidan Singh
Arduino Code:
int potVal = 0;
int tempo = 1000;
int lastTime = 0;
int ledPins[4] = {29,30,31,32};
int lastStep = 0;
int currentStep = 0;
int totalSteps = 4;

void setup() {
  Serial.begin(9600);
  for(int i = 0; i< 4; i++){
    pinMode(ledPins[i], OUTPUT);
  }
}

void loop() {
  readPot();
  if(millis() > lastTime + tempo ){
    serialCommunication();
    lastTime = millis();
    digitalWrite(ledPins[lastStep], LOW);
    digitalWrite(ledPins[currentStep], HIGH);
    lastStep = currentStep;
    currentStep++;
    if(currentStep == totalSteps){
      currentStep = 0;
    }
  }
}

void readPot(){
  potVal =analogRead(A18);
  tempo = map(potVal, 0, 1023, 100, 1000);
}

void serialCommunication(){
  Serial.write(currentStep);
  //delay(50);
}
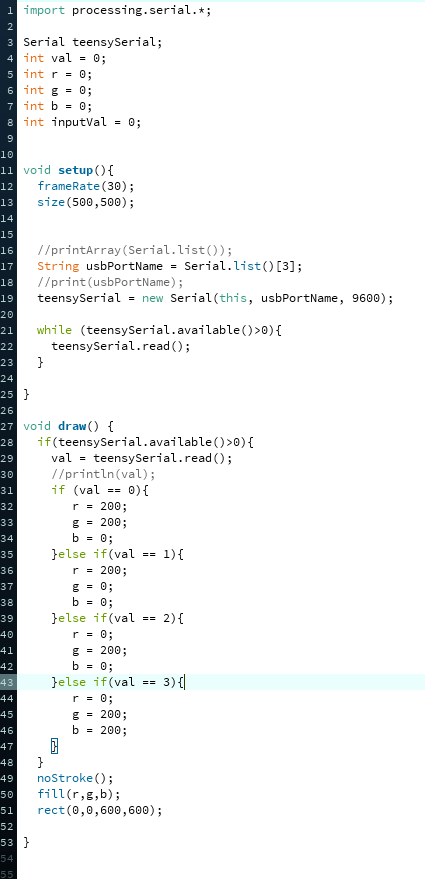
Processing Code:
Aidan Singh
Main code for 4 MIDI-controlling buttons:
#include "Button.h"

Button buttonOne(33, 60);
Button buttonTwo(34, 62);
Button buttonThree(35, 64);
Button buttonFour(36, 65);

void setup() {
  Serial.begin(9600);
  buttonOne.pressHandler(onPress);
  buttonOne.releaseHandler(onRelease);
  buttonTwo.pressHandler(onPress);
  buttonTwo.releaseHandler(onRelease);
  buttonThree.pressHandler(onPress);
  buttonThree.releaseHandler(onRelease);
  buttonFour.pressHandler(onPress);
  buttonFour.releaseHandler(onRelease);

}

void loop() {
  buttonOne.process();
  buttonTwo.process();
  buttonThree.process();
  buttonFour.process();

}

void onPress(int buttonNumber) {
  Serial.print(buttonNumber);
  Serial.println(" pressed");
  usbMIDI.sendNoteOn(buttonNumber, 90, 1);
}

void onRelease(int buttonNumber) {
  Serial.print(buttonNumber);
  Serial.println(" released");
  usbMIDI.sendNoteOff(buttonNumber, 0, 1);

}
Speculative explanation of pressCallback and releaseCallback:
In the Button.cpp program, the process() function calls pressCallback with the argument buttonNum at the moment the button is pressed, and calls releaseCallback with the argument buttonNum at the moment the button is released.
Therefore: When a button is pressed, a function (pressCallBack) will run. When a button is released, a function (releaseCallBack) will run.
In the Button.cpp program, the pressHandler function takes a function argument and sets pressCallback to it. The releaseHandler function takes a function argument and sets it to pressCallback to it.
Therefore: pressHandler and releaseHandler set what pressCallback and releaseCallback do respectively.
In practice: In the part_1_button program, buttonOne.pressHandler(onPress) means that the object buttonOne will run the function pressHandler, taking the argument onPress. This function(in the setup) sets the function that happens when button one is pressed(in the loop).
I haven’t done much stuff in C++, as I’ve mainly used Java. Although the syntax is a little foreign, this was a great demo to get me thinking about other things to do with Arduino.
Aidan Singh
This lab introduced the Processing app and language, and how to make it interface with Arduino using Serial commands.
The instructional video created by Professor Litt showed a circle first translating and growing based on input from two potentiometers, and later automatically moving across the screen, at a rate determined by one of the potentiometers.
For the assignment which required use of 5 potentiometers, I made them control the size, position and color of an ellipse (height, width, center x and y coordinates, and amount of blue.)
int ledPin = 32;
int potPin [5] = {A14,A15,A16,A17,A18};
int potVal[5] = {0,0,0,0,0};
int mappedPotVal[5] = {0,0,0,0,0};

void setup() {
  Serial.begin(9600);
  pinMode(ledPin, OUTPUT);
}

void loop() {

  Serial.write(0);

  for(int i=0; i<5;i++){
    potVal[i] =analogRead(potPin[i]);
    mappedPotVal[i] = map(potVal[i], 0, 1023, 1, 255);
    Serial.write(mappedPotVal[i]);
  }

  delay(50);

}
Aidan Singh
int ledPin [4] = {29,30,31,32};
int channelLedPin [3] = {7,8,9};
int buttonPin [4] = {33,34,35,36};
int switchPin = 38;
bool lastButtonState [4] = {LOW,LOW,LOW,LOW};
bool buttonState [4] = {LOW,LOW,LOW,LOW};
bool switchedOn[3][4] = {
  {false,false,false,false},
  {false,false,false,false},
  {false,false,false,false},
};

int channelButtonPin = 39;
int channelDisplayed = 0;
bool channelButtonState = LOW;
bool lastChannelButtonState = LOW;

int tempo=1000;
unsigned long lastStepTime = 0;
int currentStep = 0;
int totalSteps = 4;

void setup() {
  pinMode(channelButtonPin,INPUT);
  for(int i=0;i<4;i++){
    pinMode(ledPin [i],OUTPUT);
    pinMode(buttonPin [i],INPUT);
  }
  for(int i=0;i<3;i++){
    pinMode(channelLedPin [i],OUTPUT);
  }
  pinMode(switchPin,INPUT);
}

void loop(){


  digitalWrite(channelLedPin[channelDisplayed],HIGH);
  if(digitalRead(switchPin) == HIGH){ //checks forwards/backwards button
    stepForwards();
  }else{
  stepBackwards();}
  tempo =analogRead(A18);
  checkButtons();
  updateLeds();
}

void stepForwards(){
  if(millis() >= lastStepTime + tempo) {
    lastStepTime = millis();
    usbMIDI.sendNoteOff(37, 0, 1);//SENDS MIDI NOTE OFF
    usbMIDI.sendNoteOff(39, 0, 1);
    usbMIDI.sendNoteOff(40, 0, 1);
    currentStep++;
    if(currentStep == totalSteps){
      currentStep = 0;
    }
    if(switchedOn[0][currentStep] == true){ //SENDS MIDI NOTE ON
    usbMIDI.sendNoteOn(37, 90, 1);
  }
  if(switchedOn[1][currentStep] == true){ //SENDS MIDI NOTE ON
    usbMIDI.sendNoteOn(39, 90, 1);
  }
  if(switchedOn[2][currentStep] == true){ //SENDS MIDI NOTE ON
    usbMIDI.sendNoteOn(40, 90, 1);
  }
 }
}

 void stepBackwards(){
  if(millis() >= lastStepTime + tempo) {
    lastStepTime = millis();
    usbMIDI.sendNoteOff(37, 0, 1);//SENDS MIDI NOTE OFF
    usbMIDI.sendNoteOff(39, 0, 1);
    usbMIDI.sendNoteOff(40, 0, 1);
    currentStep--;
    if(currentStep < 0){
      currentStep = 3;
    }
    if(switchedOn[0][currentStep] == true){ //SENDS MIDI NOTE ON
    usbMIDI.sendNoteOn(37, 90, 1);
  }
  if(switchedOn[1][currentStep] == true){ //SENDS MIDI NOTE ON
    usbMIDI.sendNoteOn(39, 90, 1);
  }
  if(switchedOn[2][currentStep] == true){ //SENDS MIDI NOTE ON
    usbMIDI.sendNoteOn(40, 90, 1);
  }
}
 }


void checkButtons() {

    lastChannelButtonState = channelButtonState;
    channelButtonState = digitalRead(channelButtonPin);
    if(lastChannelButtonState == LOW && channelButtonState == HIGH) {
      digitalWrite(channelLedPin[channelDisplayed],LOW);
      changeChannel();
      digitalWrite(channelLedPin[channelDisplayed],HIGH);
      delay(5);
    } else if(lastChannelButtonState == HIGH && channelButtonState == LOW) {
      delay(5);
    }

    for(int i=0;i<4;i++){
    lastButtonState[i] = buttonState[i];
    buttonState[i] = digitalRead(buttonPin[i]);
    if(lastButtonState[i] == LOW && buttonState[i] == HIGH) {
      flipButtonState(i);
      delay(5);
    } else if(lastButtonState[i] == HIGH && buttonState[i] == LOW) {
      delay(5);
    }
  }
}


void changeChannel() {
    channelDisplayed++;
    if(channelDisplayed == 3){
      channelDisplayed = 0;
    }
}

void flipButtonState(int i) {
    if(switchedOn[channelDisplayed][i] == true) {
      switchedOn[channelDisplayed][i] = false;
    } else if(switchedOn[channelDisplayed][i] == false) {
      switchedOn[channelDisplayed][i] = true;
    }
}

void updateLeds() {
  for(int i=0;i<4;i++){
  if(switchedOn[channelDisplayed][i] == true) {//lights LED if button was pressed
    digitalWrite(ledPin[i], HIGH);
  } else if(currentStep == i){//lights LED of current step
    digitalWrite(ledPin[i], HIGH);
  }
    else {digitalWrite(ledPin[i], LOW);
  }
  }
}
Aidan Singh
int ledPin [4] = {29,30,31,32};
int buttonPin [4] = {33,34,35,36};
int switchPin = 38;
bool lastButtonState [4] = {LOW,LOW,LOW,LOW};
bool buttonState [4] = {LOW,LOW,LOW,LOW};
bool switchedOn[4] = {false,false,false,false};

int tempo=1000;
unsigned long lastStepTime = 0;
int currentStep = 0;
int totalSteps = 4;

void setup() {
  for(int i=0;i<4;i++){
    pinMode(ledPin [i],OUTPUT);
    pinMode(buttonPin [i],INPUT);
  }
  pinMode(switchPin,INPUT);
}

void loop(){
  if(digitalRead(switchPin) == HIGH){ //checks forwards/backwards button
    stepForwards();
  }else{
  stepBackwards();}
  tempo =analogRead(A18);
  checkButtons();
  updateLeds();
}

void stepForwards(){
  if(millis() >= lastStepTime + tempo) {
    lastStepTime = millis();
    usbMIDI.sendNoteOff(39, 0, 1);//SENDS MIDI NOTE OFF
    currentStep++;
    if(currentStep == totalSteps){
      currentStep = 0;
    }
    if(switchedOn[currentStep] == true) //SENDS MIDI NOTE ON
    usbMIDI.sendNoteOn(39, 90, 1);
  }
 }

 void stepBackwards(){
  if(millis() >= lastStepTime + tempo) {
    lastStepTime = millis();
    usbMIDI.sendNoteOff(39, 0, 1);//SENDS MIDI NOTE OFF
    currentStep--;
    if(currentStep < 0){
      currentStep = 3;
    }
    if(switchedOn[currentStep] == true) //SENDS MIDI NOTE ON
    usbMIDI.sendNoteOn(39, 90, 1);
  }
}


void checkButtons() {
  for(int i=0;i<4;i++){
  lastButtonState[i] = buttonState[i];
  buttonState[i] = digitalRead(buttonPin[i]);
  if(lastButtonState[i] == LOW && buttonState[i] == HIGH) {
    flipButtonState(i);
    delay(5);
  } else if(lastButtonState[i] == HIGH && buttonState[i] == LOW) {
    delay(5);
  }
  }
}


void flipButtonState(int i) {
    if(switchedOn[i] == true) {
      switchedOn[i] = false;
    } else if(switchedOn[i] == false) {
      switchedOn[i] = true;
    }
}

void updateLeds() {
  for(int i=0;i<4;i++){
  if(switchedOn[i] == true) {//lights LED if button was pressed
    digitalWrite(ledPin[i], HIGH);
  } else if(currentStep == i){//lights LED of current step
    digitalWrite(ledPin[i], HIGH);
  }
    else {digitalWrite(ledPin[i], LOW);
  }
  }
}
Aidan Singh
Description of On-Off Button:
The on-off button uses two functions.
The first, checkButton(), detects the moment the button goes from unpressed to pressed. If this is the case, it activates the second function.
The second function is flipButtonState(). When used, it flips the state of an on-off boolean. For example, if the boolean is false before the function runs, it will become true after. If it was true first, it will become false.
The boolean controls whether or not the LED’s are off or updated by the pots.
#include <Adafruit_NeoPixel.h>

// replace the 32 below with whatever pin your Neopixel is connected to
Adafruit_NeoPixel neopixel = Adafruit_NeoPixel(2, 32, NEO_RGB);

int buttonPin = 36;

bool lastButton1State = LOW;
bool button1State = LOW;

bool switchedOn = false;

int tempo = 100;
int red = 0;
int green = 0;
int blue = 0;
int potPins[3] = {A14, A15, A16};


void setup() {
  Serial.begin(9600);
  neopixel.begin();
  neopixel.clear();
  neopixel.show();
  pinMode(buttonPin, INPUT);
}

void loop() {
  checkButton();
  changeColor();
}


void changeColor() {


  red = map(analogRead(potPins[0]), 0, 1023, 0, 100);
  green = map(analogRead(potPins[1]), 0, 1023, 0, 100);
  blue = map(analogRead(potPins[2]), 0, 1023, 0, 100);

  Serial.println(red);

  if(switchedOn == true) {
    neopixel.setPixelColor(0, red, green, blue);
    neopixel.setPixelColor(1, green, blue, red);
  } else {
    neopixel.setPixelColor(0, 0, 0, 0);
    neopixel.setPixelColor(1, 0, 0, 0);
  }

  neopixel.show();
  delay(tempo);
}

void checkButton() {
  lastButton1State = button1State;
  button1State = digitalRead(buttonPin);
  if(lastButton1State == LOW && button1State == HIGH) {
    flipButtonState();
    delay(5);
  } else if(lastButton1State == HIGH && button1State == LOW) {
    delay(5);
  }
}

void flipButtonState() {
    if(switchedOn == true) {
      switchedOn = false;
    } else if(switchedOn == false) {
      switchedOn = true;
    }
}
Aidan Singh
//pins
int potPins[4] = {A14, A15, A16, A17};
int ledPins[4] = {28, 29, 30, 31};
int speedPotPin = A13;
int stepPot = A21;
int octaveSwitchPin = 37;
int onSwitchPin = 38;
int backwardsSwitchPin = 39;


//values
int octave = 0;
int lastStep = 0;
int tempo = 1000;
int currentStep = 0;
int totalSteps = 4;
unsigned long lastStepTime = 0;

int lastPitch = 0;
int currentPitch = 0;

void setup() {
  Serial.begin(9600);
  for (int i = 0; i < 4; i++) {
    pinMode(ledPins[i], OUTPUT);
  }
  pinMode(octaveSwitchPin, INPUT);
  pinMode(onSwitchPin, INPUT);
  pinMode(backwardsSwitchPin, INPUT);
}


void loop() {

  if (digitalRead(onSwitchPin) == HIGH) {
    if (digitalRead(backwardsSwitchPin) == HIGH) {
      sequenceForwards();
    }
    else {
      sequenceBackwards();
    }
  }
}

void sequenceForwards() {

  if (millis() >= lastStepTime + tempo) {
    sequenceSetup();
    lastStepTime = millis();
    note();
    lastStep=currentStep;
    currentStep++;
    if (currentStep == totalSteps) {
      currentStep = 0;
    }
    Serial.println(currentStep);
  }
}

void sequenceBackwards() {
  if (millis() >= lastStepTime + tempo) {
    sequenceSetup();
    lastStepTime = millis();
    note();
    lastStep=currentStep;
    currentStep--;
    if (currentStep < 0) {
      currentStep = totalSteps - 1;
    }
  }
}

void sequenceSetup() {
  totalSteps = 4;//map(analogRead(stepPot), 0, 1023, 0, 4);
  tempo = map(analogRead(speedPotPin), 0, 1023, 100, 1000);
  if (digitalRead(octaveSwitchPin) == HIGH) {
    octave = 12;
  } else {
    octave = 0;
  }
}

void note() {
  currentPitch = map(analogRead(potPins[currentStep]), 0, 1023, 60, 72) + octave;
  digitalWrite(ledPins[lastStep], LOW);
  usbMIDI.sendNoteOff(lastPitch, 0, 1);
  usbMIDI.sendNoteOn(currentPitch, 90, 1);
  digitalWrite(ledPins[currentStep], HIGH);
  lastPitch = currentPitch;

}
Aidan Singh
***Includes Bonus***
int ledPins[4] = {28,29,30,31};
int potPin = 32;
int switchPin1 = 33;
int switchPin2 = 34;

int tempo=1000;
unsigned long lastStepTime = 0;
int currentStep = 0;
int totalSteps = 4;


void setup() {
    for(int i=0;i<4;i++){
      pinMode(ledPins[i], OUTPUT);
    }
    pinMode(switchPin1, INPUT);
    pinMode(switchPin2, INPUT);
}

void stepForwards(){
  if(millis() >= lastStepTime + tempo) {
    lastStepTime = millis();
    digitalWrite(ledPins[currentStep],LOW);
    currentStep++;
    if(currentStep == totalSteps){
      currentStep = 0;
    }
    digitalWrite(ledPins[currentStep],HIGH);
  }
}

void stepBackwards(){
  if(millis() >= lastStepTime + tempo) {
    lastStepTime = millis();
    digitalWrite(ledPins[currentStep],LOW);
    currentStep--;
    if(currentStep < 0){
      currentStep = 3;
    }
    digitalWrite(ledPins[currentStep],HIGH);
  }
}

void stepRand(){if(millis() >= lastStepTime + tempo) {
    lastStepTime = millis();
    digitalWrite(ledPins[currentStep],LOW);
    currentStep = random(0, 4);
    digitalWrite(ledPins[currentStep],HIGH);
  }

}

void loop(){
  tempo =analogRead(A13);
  if(digitalRead(switchPin2) == HIGH){
    if(digitalRead(switchPin1) == HIGH){
      stepForwards();
    }else{
      stepBackwards();
    }
  }else{
    stepRand();
  }

}
Aidan Singh
Here is the updated code that utilizes the for loops and arrays (INCLUDING BONUS).
int potValue=0;
int pause=0;
int someVar= 0;
int numLED = 4;

int ledPins[4] = {28,29,30,31};
int buttonPins[4] = {33,34,35,36};

void setup() {
    Serial.begin(9600);
    for(int i=0;i<4;i++){
      pinMode(ledPins[i], OUTPUT);
      pinMode(buttonPins[i], INPUT);
    }
}

void loop(){
  potValue = analogRead(A13);
  pause = potValue;

  numLED= map(analogRead(A21),0,1024, 1,4);

  if(digitalRead(buttonPins[0]) == HIGH) {
    for(int i=0;i<numLED;i++){
      digitalWrite(ledPins[i], HIGH);
    }
    delay(pause);
    for(int i=0;i<numLED;i++){
      digitalWrite(ledPins[i], LOW);
    }
    delay(pause);
  }

  if((digitalRead(buttonPins[1]) == HIGH) && (digitalRead(buttonPins[2]) == HIGH)) {
    for(int i=0;i<numLED;i++){
      digitalWrite(ledPins[i], HIGH);
      delay(pause);
      digitalWrite(ledPins[i], LOW);
    }
  }

  if((digitalRead(buttonPins[1]) == HIGH) && (digitalRead(buttonPins[2]) == LOW)) {
    for(int i=numLED;i>0;i--){
      digitalWrite(ledPins[i-1], HIGH);
      delay(pause);
      digitalWrite(ledPins[i-1], LOW);
    }
  }

  if(digitalRead(buttonPins[3]) == HIGH){
    someVar = random(28, 32);
    digitalWrite(someVar, HIGH);
    delay(pause);
    digitalWrite(someVar, LOW);
  }
}
